Navigation List

Showing posts with label Dessert. Show all posts

Saturday, October 26, 2019

Raspberry Swirled Cheesecake Cupcakes


Raspberry Swirled Cheesecake Cupcakes

Yield: 12 cupcakes

Ingredients

Crust
3/4 cup + 2 Tbsp graham cracker crumbs (from 7 full sheets)
1 1/2 tsp granulated sugar
3 1 /2 Tbsp salted butter, melted

Raspberry Swirl
4 oz fresh raspberries
2 Tbsp granulated sugar

Cheesecake filling
3/4 cup granulated sugar
1 Tbsp all-purpose flour
2 (8 oz) pkgs cream cheese, softened well but not melted
1 tsp lemon zest
2 large eggs
1 tsp vanilla extract
1/4 cup sour cream

Read more >> Raspberry Swirled Cheesecake Cupcakes @ www.cookingclassy.com

Cheesecake Brownies


Cheesecake Brownies


Ingredients

Cheesecake Mixture:
1 (8 ounce) package cream cheese, softened
¼ cup white sugar
1 egg
1 cup white chocolate chips

Brownie Mixture:
¼ cup butter
1 cup milk chocolate chips
½ cup white sugar
2 eggs
⅔ cup all-purpose flour
½ teaspoon baking powder
¼ teaspoon salt

Read More >> Cheesecake Brownies @ lilluna.com

Banana Cupcakes with Peanut Butter Frosting

DELISH! i halved this recipe and just used 1 stick of butter in the margarine and shortenings place, i used regular JIFF peanut butter, natural peanut butter is too runny. i brought it too a pot luck and everyone LOVED it(used it to frost banana chocolate squares from this site also) its not to sweet even with all that sugar, the peanut butter flavor and bananas really stand out. this recipe is a keeper and definitely adds to any banana recipe!!

I used crunchy peanut butter and butter flavored shortening. I omitted the margarine because of the above substitution. I figured it would have more stability with more shortening. I did a drop or two of butter flavor. It's a little sweet. I am hoping it will not be so sweet once it sits.


Yum, yum, yum! This was a great recipe. I didn't add the butter flavor, since I didn't have any. And I mashed the bananas up and added them to the frosting. Was awesome on a chocolate cake!


========================================================================

LEMON RICOTTA ALMOND CAKE

Omg omg..it was sooooooo good! I followed the recipe exactly as posted! It was moist and yummy. It tasted like those lemon bars but in a sponge cake form. Perfect for my gluten intolerant husband! This recipe looks pretty versatile so I will be trying to make a key lime and pistachio version....Yay I am soo happy to have a yummy recipe to play around with!

This was delicious and very easy. My entire family enjoyed it. It is a great lunchbox treat. I changed the recipe just a bit to tone down the lemon taste. (I love the lemon, but my celiac kid does not.) I added almond extract instead of the lemon extract. Keeper! 10.5" round 22 mins.


This was a delicious cake and I can't wait to make it again and try it out on my friends. Gluten-free eating isn't a sacrifice when it taste this good.


========================================================================

HEALTHY AVOCADO BROWNIES

First of all, I did not make this recipe because it was vegan, I made it because it is a Myplate sponsored recipe. After reading the reviews, I decided to leave the oil out entirely. The recipe author said that the avocado replaced butter in this recipe, so I couldn't wrap my head around the need for any more oil if it was a replacement for oil. There is enough "oil" with the combination of the avocado, peanut butter and chocolate chips. Next, I halved the recipe and made it in an 8x8 baking dish. I used regular 1% milk in place of the soy milk (Again, not looking for this to be vegan) and doubled the amount called for. 

I didn't bother with "cooking the chocolate, sugar and pb until bubbly like candy"...I simply melted the pb with the chocolate chips in the microwave. I think cooking melted chocolate chips to this degree of heat would cause the chocolate to seize, giving you a gritty texture. I used my magic bullet to combine the milk and the avocado and then combined the rest of the ingredients in a large bowl (including the sugar, which I reduced to 1/2 cup for half this recipe). I added the melted chocolate/pb, the avocado/milk, a 1/2 tsp of vanilla extract and the flour mixture together and combined until just mixed. I baked them for about 20 -25 minutes in an 8x8" pan and they came out really nice. Not greasy at all. Smooth and fudgy.


Followed recipe instructions, and it came out great. Family all enjoyed brownies! I'm not Vegan, but this recipe perked my interest!!


========================================================================


Friday, October 25, 2019

EASY BANANA CREAM PIE

A delightfully light, not too sweet, cool treat. using sugar free pudding and a half container of light whipped topping. The one banana was not overpowering and the cinnamon and carmel gave the pie a new yummy twist to the same old pie.

My husband, who loves banana cream pies, would have liked more bananas, but said he liked the cinnamon and would definitely eat it again.
 This recipe was extremely quick and easy.


 Very quick, easy, light, and delicious! I also made it with banana cream pudding Very easy and quite good. I substituted Banana Cream Pudding to give the pie more of a banana flavor


========================================================================

Mini French Silk Pie

Ohhhhhhhh, decadence. A mile-high version of the traditional French Silk Pie . It seems to be updated, calling for pasteurized eggs or egg substitute, but I'm not intimidated by raw eggs, so I just used four fresh, large eggs (and lived to tell about it without incident). As you beat it, it gets fluffier and fluffier, as well as lighter in color. For color and taste I thought an Oreo cookie crust might be even better, so I made a crust of 24 regular-size Oreo cookies and 1/4 cup melted butter. Had I used a traditional pie crust I might have liked this with one more square of melted chocolate. Very rich, so cut slices accordingly.
 This is most likely why the French Silk Pie recipe I'm used to calls for half this amount of filling (and then of course you bury it under a couple inches of whipped cream). I garnished this with fresh whipped cream, raspberries, and mini chocolate chips. And as it turned out, I found I actually do prefer the pie with the Oreo crust. 

 Loved it! Only suggestion would be to separate the eggs, blending in the yolks as called for but whipping up the whites then gently folding them in for increased volume. 


 Wow!!!! This was absolutly amazing! I was a bit worried while making this that it wasn't going to turn out, because upon tasting it it tasted grainy. After adding the eggs this was much better. I used a pre-made Keebler shortbread pie crust.


========================================================================


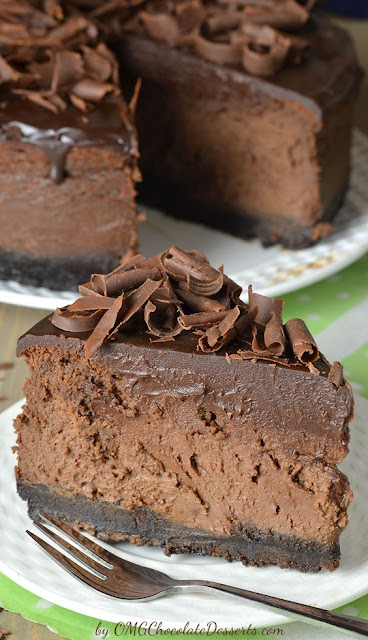
Triple Chocolate Cheesecake With Oreo Crust

Triple Chocolate Cheesecake With Oreo Crust


Refrigerated pies are perfect when you need a make-ahead dessert. With an OREO Cookie crust and three layers of chocolatey creamy goodness, we suspect that this creamy pie will make it on your list of family favorites.

Watch everyone's eyes light up when you bring out this fantastic cake, made to look like a giant-size OREO Cookie. The best part? It tastes as good as it looks! A cookie crust holds three chocolatey layers for a creamy no-bake pie.


This was the most excellent Oreo recipe pie I have ever come across. It's a bit more difficult to make than what you might think, despite the easy ingredients, and it can be a little time consuming with the layers. These are the only changes I would make to this recipe: Allow it to set overnight, as opposed to only 4 hours. I would recommend freezing the pie prior to serving for easy cutting & aesthetic presentation. I also topped each slice off with an Oreo cookie. Delicious!

I made this 6 hours before we ate it and when I went to cut it, it was sloppy. The flavor was amazing. It was like some brownie or something. I used chocolate filled generic Oreos and it was a chocolate lovers dream. I also sprinkled some cookie crumbs on top of the pie. 

get recipe here >> Triple Chocolate Cheesecake With Oreo Crust @ http://omgchocolatedesserts.com/
========================================================================

Layered Green Tea Panna Cotta


Layered Green Tea Panna Cotta


Panna cotta is one of my favorite desserts and with the addition of green tea, it makes it even more decadent! So easy to make, but yet elegant enough for company or a fancy dinner. 


 This is so perfect in the summer, and not just because it's easy and refreshing. All that amazing seasonal fruit gives you the perfect reason…excuse…to make these easy treats. If you start your panna cotta the day before you want to eat it, this classic Italian recipe is about as simple as it gets. 


 This was so good. We loved it! I prepared it according to the instructions and it turned out perfect. A very flavorful fresh Panna Cotta. The recipe was quick & easy to make! The only thing I would try different is add more gelatin. It could have been firmer, perhaps it is a difference in gelatin brands. When I topped it with the green tea it fell. I will double the gelatin the recipe calls for next time. For simplicity, pie filling could be used for the sauce. I enjoyed this recipe. It was a nice change & could make an elegant finish to a meal. 


let get recipe here >> Layered Green Tea Panna Cotta @http://en.christinesrecipes.com/ 
========================================================================

OREO CHEESECAKE BARS

I can't say for the taste, as I made this for a family function to be held tomorrow but it looks fantastic! I can't imagine it ever tasting bad! I had no problems with caramel oozing out of the crust but I wrapped the base of my Springform in parchment paper and pressed the Oreo crust up the sides and made sure that the caramel base didn't overflow the cookie crust.

I also did a water bath with the pan wrapped in foil. I had some butter leakage but it wasn't major. Side note: I recommend using the parchment paper as I was able to easily remove the cake to a plate for drizzling the caramel and chocolate to make for a great presentation. I have always had problems serving cheesecakes directly from the pan bottom and half of the crust sticking to the pan. This eliminates that problem.


OREO CHEESECAKE BARS

20 min
Prep Time
40 min
Cook Time
1 hr

INGREDIENTS

For the crust:
23 Oreo cookies (the whole cookie - icing and all!)
2 tbsp. unsalted butter, melted
For the cheesecake:
12 oz. cream cheese, room temperature
6 tbsp. sugar
6 tbsp. sour cream, room temperature
1/2 tsp. vanilla extract
1/4 tsp. salt
1 large egg plus 1 egg yolk
12 Oreo cookies, roughly chopped (the whole cookie - icing and all!)

INSTRUCTIONS

  • Preheat the oven to 325 degrees and line a 8x8 inch baking dish with foil. Let two sides of the foil overhang on the baking dish (so it's easier to pull out the cheesecake).
  • To make the crust, in a food processor, pulse the Oreos until they're finely ground. Add in the melted butter and pulse until the cookies are moistened.
  • Transfer the ground Oreos to the prepared baking pan and press the crumbs in an even layer over the bottom of the pan. Bake crust for 10 minutes then set aside while keeping the oven on.
  • In the bowl of a stand mixer, beat the cream cheese on medium high until light and smooth, about 2 minutes. Then mix in the sugar until well-combined.
  • Blend in the sour cream, vanilla, and salt. Then beat in the egg and egg yolk until well-incorporated.
  • Gently stir in the chopped Oreos.
  • Pour cheesecake batter over the prepared crust and smooth out the top with a spatula. Bake for 40 minutes, or until cheesecake is set around the edges but slightly wobbly in the center.
  • Let cheesecake cool to room temperature, about 1 hour then cover the pan and refrigerate until well chilled, about 3 hours. I chilled mine overnight.
  • To cut the bars, lift the overhanging foil from the pan and place it on a cutting board. Peel away the foil and slice into bars. Clean the knife blade after each slice to keep the edges pretty.
  • Keep refrigerated until ready to serve. You may keep in an airtight container in the fridge for up to a week, if it lasts that long!


READ MORE >>>>> OREO CHEESECAKE BARS @ tablefortwoblog.com

===============================================================

Low Carb Pumpkin Cheesecake Mousse

Yummmmm! I hardly never make desserts for the low carb family, but this one looked so easy. Yes definitely a keeper. I did use 2/3 c.of Splenda. I may have gotten carried away with the beating, but it turned out great. In fact, I just put it in the fridge and had to run to review it.

At first I thought the recipe was wrong and that I might need to whip the whipping cream, but decided to prepare the recipe exactly as written. The recipe instructions say to lightly fold in the whipping cream, so I thought it might have supposed to have been whipped first. It turned out great just as written. This sets like a regular cheesecake, only lighter in texture. It is still firm enough to be cut with a knife, though. I doubled the recipe because I grabbed the wrong size box of jello. It doubles quite nicely and was delicious.

My husband and I just started atkins. I made this with half and half instead of whipping cream. I got 6 servings from this recipe 1/2 cups. I used strawberry sugar free jello. My carb count was 16 net carbs for the entire batch. I did whip the half and half in the cheese jello mixture and it came together nicely. I tried just folding it in like the recipe states but I had nothing but chunks. When I used my mixer it worked great.

Get the full ingredients and instruction click here >>>>> Low Carb Pumpkin Cheesecake Mousse @ sugarfreemom.com

Individual No-Bake Pumpkin Cheesecakes

This was an awesome dessert! I followed the directions, made no changes and it came out perfect. Although there was a regular pumpkin pie there also, no one touched it, and they all raved about the Pumpkin Cheesecake. I will definately serve this again!

I halved the recipe and used a 2 quart glass baking pan. I reduced the pumpkin pie spice to 1 1/2 tsp total and didn't measure the whipped topping when adding it to the top most layer. I was afraid I wouldn't care for the crust (especially because I'm not a huge fan of pecans) but it was PERFECT so please try it before you change it. This is one of those recipes you just want to keep eating. Dangerously good!!! Don't forget to set the cream cheese & butter out to soften and the whipped topping should be in the fridge not freezer so it's easy to work with!


Individual No-Bake Pumpkin Cheesecakes

INGREDIENTS

18 round gingersnaps or Biscoff cookies, crushed
2 tbsp. unsalted butter, melted
1½ c. heavy cream, divided
1 (8 oz.) block cream cheese
½ c. brown sugar, packed
1 tsp. vanilla extract
¾ tsp. ground cinnamon
¼ tsp. ground nutmeg
¼ tsp. ground ginger
pinch ground cloves
¼ tsp. salt
1 (14 oz) can canned pumpkin puree, chilled

INSTRUCTIONS
  • In a small bowl combine cookie crumbs and melted butter, mix until evenly coated. Press into the bottom of 6 jars or glasses.
  • In the bowl of a stand mixer or a large mixing bowl, whip the heavy cream until stiff.
  • In a separate mixing bowl, beat the cream cheese until fluffy. Add the brown sugar, vanilla, cinnamon, nutmeg, ginger, cloves and salt and beat for 2 minutes. Using a spatula, fold in the pumpkin puree, then ¾ of the whipped cream.
  • Scoop into a ziploc bag, cut the corner and pipe over the cookie base. Add the remaining whipped cream to a ziploc bag, cut the corner and pipe on top (I used a tip but you don't have to). Garnish with a sprinkle of cinnamon, nutmeg, white chocolate shavings or caramel.
  • Serve immediately or refrigerate for up to 24 hours.

OREO CHEESECAKE DOUGHNUTS

I made these for my husband's birthday and they were AWESOME. I added a tablespoon of vanilla extract and I dipped the oreos in melted butter before I put them in the cups. They cooked up just like a crust (which is just cookie and butter to start with). 20 minutes for delicious mini cheesecakes can't be beat!

I was seriously craving cheesecake last night but all I had was one package of cream cheese and some oreos. I halved the recipe to make 6 and since I had no patience to wait 3 hours for it to cool I stuck them in the freezer for a bit. I didn't bother with the cool whip or chocolate drizzle (since I planned on scarfing 3 before bed) and I still feel amazing. Easy to make and delicious!

OREO CHEESECAKE DOUGHNUTS
PREP TIME : 15 mins
COOK TIME : 20 mins
TOTAL TIME : 35 mins

INGREDIENTS

Package of original refrigerated biscuits (8 count)
About 30 oz bottle of vegetable oil for frying
8 oz cream cheese
¼ cup white granulated sugar
2 Tbsp sour cream
2 Tbsp heavy cream
¾ cup powder sugar
2½ Tbsp heavy cream
10-12 Oreo cookies, finely chopped

INSTRUCTIONS
  • Preheat oil in a fryer, dutch oven or a medium sauce pot to 340-350°F. (If using a pot on a stove top, I recommend a medium setting.)
  • Beat cream cheese, sugar, sour cream and 2 Tbsp of heavy cream in a bowl for 2-3 minutes. Transfer cheesecake mixture into a piping bag fitted with a pastry filling tip. Set aside.
  • Chop Oreo cookies and place them into a wide, shallow bowl. Set aside.
  • In another wide and shallow bowl, whisk powder sugar and 2½ tbsp of heavy cream until smooth. Set aside.
  • Open the can of refrigerated biscuits and carefully take them apart. Fry biscuits, 2-3 at a time, until golden brown. Flip to the other side and fry until that side is golden brown as well.
  • Place some paper towels under a wire rack. Take out cooked doughnuts and place them on the wire rack to cool.
  • Let doughnuts cool for a couple of minutes. Then, fill each doughnut with some cheesecake mixture from the piping bag.
  • Dip each doughnut top in the glaze first and then, dip them in crushed Oreo cookies.
  • Repeat with all the doughnuts.

NO-BAKE GREEN TEA CHEESECAKES

Absolutely fabulous. I just about died when I saw this recipe. Being the matcha addict that I am, I quadrupled the amount of green tea powder. Like another reviewer, I used a hand mixer on low to avoid a rubbery texture. I also suggest refrigerating for a few hours (as long as you can keep away!) because warm cheesecake is no good. Otherwise, perfect taste, perfect texture and consistency ... the only thing I'm sad about is how much weight I'll be gaining scarfing out on this cheesecake!

Increased the amount of matcha to 3.5 tbsp and thought this was perfect (I wanted a more than subtle taste) - could really taste the green tea without it being overpowering. Regarding the "rubbery" top comment from another reviewer: I used a hand mixer at low to medium speed for all steps and fat-free cream cheese and the texture was absolutely fine. I thought the graham cracker crust worked for this recipe and the raspberries are a MUST!


No Bake Mini Green Tea Cheesecakes
INGREDIENTS

Crust:
1 cup graham crackers, crushed (about 6 sheets)
1 tbsp sugar
3 tbsp unsalted butter, melted

Cheesecake:
1 (8 oz) package cream cheese, room temperature
1/3 cup powdered sugar
1 tsp vanilla extract
2 tbsp granulated sugar
3 tsp matcha powder (adjust to your preferred matcha flavor)
1 cup heavy cream, lightly whipped
green food coloring (optional)

INSTRUCTIONS

Crust:

  • In a Ziploc bag, crush crackers until they are crumbs. Add sugar and mix. Pour in melted butter and mix until all crumbs are thoroughly wet.
  • Line a muffin pan with liners and drop a tbsp of crumb mixture into each. Pat down until crumbs are flat and firm, forming a crust. Refrigerate.

Cheesecake:

  • In a large bowl, beat together cream cheese, powdered sugar, vanilla.
  • Add in granulated sugar and green tea powder and beat until smooth.
  • Lightly whip the heavy cream and then fold it into the cream cheese mixture. Add food coloring if desired.
  • Pour the mixture into each muffin well. The cheesecakes won’t rise so fill each well fairly full.
  • Chill in the freezer for at least 3 hours, preferably overnight. Enjoy!!

Get the recipe here >>>>> NO-BAKE GREEN TEA CHEESECAKES @ goodmorningcali.com

GRINCH HOT CHOCOLATE

use 2 cups half and half, 4 cups milk, and 1 1/2 cup water instead of 6 1/2 cups water--this will make it creamier. Sometimes I double this recipe and pour everything back in the milk carton and refrigerate it as chocolate milk for my children. In that case, I use the whole gallon of milk rather than water (and no half and half or cream).

This cocoa was rich and delicious. I found that the sweetened condensed milk gave the drink just the right amount of sweetness and the recipe produced a nice large quantity of cocoa, good for when making this for more than just a couple of people. We spiked our cocoa with Bailey's, and spooned cool whip on top. So good...

Grinch Hot Chocolate

INGREDIENTS

2 Cups milk (I used Unsweetened Cashewmilk)
4 Ounces white chocolate (chopped)
green food coloring
1 teaspoon pure vanilla extract
1 Tablespoon Peppermint Schnapps
1 Tablespoon Vanilla Vodka
whipped topping

INSTRUTCIONS
  • Add milk and chopped white chocolate to a medium saucepan.
  • Heat over LOW heat until chocolate is melted and milk is heated through.
  • Remove from heat and add green coloring.
  • Pour into mugs and "flavor" with your choice of Naughty or Nice flavorings.
  • Top with whipped topping, green sprinkles, and red heart.

25 Easy Christmas Desserts for a Sweeter Christmas

LOVE this cake! I suggest only a couple of modifications, but if you can't make the changes, make this cake anyway because it is a real crowd pleaser. First, use Demerara sugar instead of brown sugar if you can. It's usually found in regular grocery stores, next to the other sugars, and it doesn't cost much more. It's is a light brown sugar that provides a stickier texture and a really rich aroma-- perfect for this cake. Second, marinate the candied fruit in the brandy for as long as you can. You really want the fruit to be plump. Third, follow the directions for a long baking time in low heat. Don't try to speed things up by increasing the temperature (like I once did...)! Fourth, top with Royal Icing-- there are some very good recipes for it on this website. Royal Icing is a bit tricky to work with, but it's worth the effort!

This recipe is awesome! The first year I've used it, I got several compliments from family and friends. The second year, I gave cakes away as gifts. Now people wait for it every Christmas. I have my great aunts - who are great cooks and bakers themselves and who are very critical about other people's cooking who actually want this recipe for themselves. I never thought making fruitcakes could be so fun and rewarding!
This cake was awesome. I made 3 loaf pans of this recipe,super moist. Poked holes on top and drizzled 1 oz brandy over all 3 loaves once a week fro 3 weeks. Took slices to work and all my coworkers gave rave reviews. I love fruit cake and liked putting in fruit that I like,will try cranberries next year.

Get all the recipes and instructions for the desserts just here >>>> 25 Easy Christmas Desserts for a Sweeter Christmas @ christmas.365greetings.com

Thursday, October 24, 2019

MINI SANTA HAT CHEESECAKES

abulous and wonderfully versatile! I have made Bailey's Irish Cream cheesecakes by omitting the lemon juice, adding 3 Tb Irish cream, and 2 Tb sour cream. After they cool, I brush the tops with a little more Irish Cream, and no one can get enough! Of course, the fruit topped minis are lovely, as well, made according to directions. They can be made chocolate by sprinkling the bottoms of the papers with crushed Oreos, eliminating the lemon juice and stirring 1/2 cup of melted chocolate chips and 1/4 tsp vanilla into the filling.

To dress those up even further, I have been known to top the Oreo crumbs with 1 tsp hot fudge sauce, then pour the topping in. Also lovely is a grasshopper version, using the Oreo crumbs, and in place of the lemon juice, add 2 Tb green creme de menthe and 1 Tb creme de cacao. I will sometimes even fold mini chocolate chips into this one. The possibilities are literally limitless. Simple to make, even simpler to eat! These freeze like champs.
This was sooooooooooo good. I live with three guys and they gobbled these little cakes up. I don't cook so this was a little surprise for them. We all loved it and i will make this again. The only thing I changed with this recipe is the crust. Instead of the vanilla waffer (which occasionally gets soft and soggy) I crush up some graham crackers, mix it with some melted butter and then place it in cupcake cup holders. Then place the cream cheese mixture on top. Then cook.

click here for full recipes >>> MINI SANTA HAT CHEESECAKES @ bakedbyrachel.com

Hot Cocoa Cheesecake Dip

Quick and easy recipe. I like it better than the prepackaged stuff. As soon as I saw 2 tablespoons of sugar for one cup of milk I knew it would be too sweet so I used 1 tablespoon of sugar. It still was too sweet so next time I make it I will less than a tablespoon of sugar. I am also going to increase the cocoa amount a little bit. I will add cinnamon as suggested by someone else here. Eventually I will have a perfect and easy recipe for hot cocoa.

I have been making this recipe for about a year now-- it is the best cocoa recipe I have found. I like making it for the kids after school on cold days like today. I use Hershey's Special Dark Cocoa (the regular stuff doesn't taste chocolatey enough to me). I also skip the vanilla and instead use a teaspoon of vanilla caramel liquid coffee creamer-- it adds a little depth to the flavor of the cocoa. It also tastes fine if you leave out the vanilla and give away the dry mix as a gift.
Hot Cocoa Cheesecake Dip

Prep Time: 5 minutes

INGREDIENTS

4 (.73 oz) envelopes hot cocoa mix without marshmallows
1 (8 oz.) package cream cheese, room temperature
4 oz. cool whip, thawed
2 -3 T. vanilla mallow bits

INSTRUCTIONS
  • In a medium mixing bowl, add in the hot cocoa mix and cream cheese. Mix on medium with a hand mixer until thoroughly incorporated.
  • Add in the cool whip and continue to beat until combined.
  • Scoop into a serving bowl and top with vanilla mallow bits. Serve with cookies.
  • Store in the refrigerator.

Salted Caramel Chocolate Cake

Although I did use the "light' cream cheese in a desperate attempt to lighten the calorie load! LOL! Was still fabulous, had to give over half away to daughter and SIL to take home so I wouldn't eat anymore of it - polished off the last piece I kept for breakfast this morning...ok...now...OFF to the Gym!

My husband and guests loved this! Huge hit! I also stirred about 3/4 cup of broken oreos into the batter. I didn't do a standard water bath as some suggested, instead i filled a 9 x 13 pan about 1/3 of the way with water, then put it on the rack just below the cheescake. When the top started to turn golden brown I covered it with foil. I followed the advice to turn the oven off, leave the door open and let cool for an hour. Next time ill try reese peanut butter cups.


Salted Caramel Chocolate Cake

Prep Time: 1 hour, 30 minutes
Cook Time: 30 minutes
Total Time: 2 hours

INGREDIENTS

For the chocolate cake:
2 cups granulated sugar
1 cup light brown sugar, packed
2 and 3/4 cups all-purpose flour (not packed!)
1 and 1/2 cups unsweetened cocoa powder, sifted
3 teaspoons baking soda
1 and 1/2 teaspoons baking powder
1 and 1/4 teaspoons salt
3 large eggs + 2 large egg yolks, at room temperature
1 and 1/2 cups full-fat sour cream
1/3 cup whole milk
3/4 cup vegetable oil (you may also sub in melted coconut oil)
2 tablespoons vanilla extract
1 and 1/2 cups hot water

For the salted caramel chocolate frosting:
2 cups unsalted butter (4 sticks, 16 ounces), VERY soft
4 and 1/2 cups confectioners' sugar, sifted
3/4 cup unsweetened cocoa powder, sifted
1 teaspoon vanilla extract
1/2 teaspoon salt
3 tablespoons heavy cream (more if needed)
2 tablespoons salted caramel sauce

Garnish:
1 and 1/4 cups salted caramel sauce (please see post for more on this)
Flaky sea salt

INSTRUCTIONS

For the chocolate cake:
  • Preheat oven to 350°(F). Cut out three 9-inch round segments of parchment paper to line your cake pans with. Spray each pan generously - sides and bottom - with nonstick cooking spray, then place the parchment paper cut out in the bottom of the pans and spray again. It's important to make sure every bit of pan and paper are sprayed so your cakes don't get stuck. Set pans aside.
  • In the bowl of a stand mixer fitted with the paddle attachment, or in a large bowl using a handheld electric mixer, combine both sugars, flour, cocoa powder, baking soda, baking powder and salt; mix on low until dry ingredients are thoroughly combined. Use your hands to break up any large clumps, if needed. In a separate bowl combine the eggs, egg yolks, sour cream, milk, oil and vanilla extract; mix until completely combined. Pour mixture into the dry ingredients and beat on low until just incorporated. Pour in hot water and continue mixing until completely combined; about 1 minute. The batter will quite thin.
  • Divide batter evenly among prepared pans. Bake in preheated oven for 30 minutes, or until a wooden toothpick or cake tester inserted in the center of a cake comes out clean or with just a few moist crumbs attached. Cool cakes for 10 minutes in the pan before removing from pans and transferring to a cooling rack; cool cakes completely before frosting.

For the chocolate frosting:
  • In a stand mixer fitted with the paddle attachment, cream the softened butter on medium-speed until completely smooth; about 3 minutes. Turn the mixer off and sift the powdered sugar and cocoa into the mixing bowl. Turn the mixer on the lowest speed and mix until the sugar/cocoa have been absorbed by the butter; about 2 minutes. Increase mixer speed to medium; add in vanilla extract, salt, heavy cream and salted caramel; beat for 3 minutes. If your frosting appears a little too thin, add a little more confectioners' sugar; If your frosting needs to be thinner, add additional heavy cream, 1 tablespoon at a time.

Assembly:
  • Using a serrated knife, carefully trim the raised top of each cake, making each one an even, level surface. Transfer 1 layer to a large plate or cake stand. Spread a thin layer of frosting on top, then add a 1/2 cup of caramel; top with another cake layer, and repeat, thinly spread it with a layer of frosting, then adding a 1/2 cup of caramel. Top final cake layer and place cake in the fridge to set for 1 hour. Once set, finishing frosting the top and sides of the cake. Sprinkle with sea salt. Slice and serve, or keep refrigerated for up to 5 days.


Chocolate Sugar Cookies

I think these cookies place a nice spin on chocolate sugar cookies. They're chewy and delicious. After recently coming across cinnamon M&M's, I decided to make these cookies with them. They're yummy. The cinnamon/chocolate flavor is subtle - and I would keep it that way. The only other thing I did differently was to replace the shortening with butter. When I did that, I chilled the cookie dough in the fridge for an hour before shaping and baking.

Excellent! I followed other reviewers and omitted the margarine/cocoa step and added the cocoa directly to the dry ingredients. I chilled the dough 2 hours and had no trouble rolling these into balls. Using my small cookie scoop I got 47 cookies, and I rolled some in powdered sugar and some in granulated. Unlike some of the other reviewers - we prefer the look and taste of those rolled in granulated sugar. Mine were perfect at 8 minutes, slightly crisp on the outside and chewy (almost brownie-like) inside. A new favorite for us! Thanks for sharing!


Chocolate Sugar Cookies

INGREDIENTS

3/4 cup (172g) unsalted butter, softened to room temperature
1 cup (200g) granulated sugar
1 large Eggland's Best egg, at room temperature
1 teaspoon pure vanilla extract
1 and 1/2 cups (188g) all-purpose flour (spoon & leveled)
3/4 cup (63g) unsweetened natural cocoa powder (or dutch process)
1 teaspoon baking powder
1/8 teaspoon salt

For Decorating
My easy icing or royal icing with meringue powder (I used the royal icing)
Assorted sprinkles

INSTRUCTIONS
  • In a large bowl using a hand-held mixer or stand mixer fitted with a paddle attachment, beat the butter for 1 minute on medium speed until completely smooth and creamy. Add the granulated sugar and beat on medium high speed until fluffy and light in color. Beat in the egg and vanilla extract on high speed. Scrape down the sides and bottom of the bowl as needed.
  • Sift the flour and cocoa powder together in a medium bowl. Whisk in the baking powder and salt until combined. On low speed, slowly mix into the wet ingredients until combined.
  • Divide the dough into 2 equal parts. Roll each portion out onto a piece of parchment to about 1/4″ thickness. Stack the pieces (with parchment paper between) onto a baking sheet and refrigerate for at least 1 hour. Chilling is mandatory. If chilling for more than a couple hours, cover the top dough piece with a single piece of parchment paper. You can chill up to 2 days.
  • Once chilled, preheat oven to 350°F (177°C). Line 2-3 large baking sheets with parchment paper or silicone baking mats. The amount of batches will depend on how large/small you cut your cookies. Remove one of the dough pieces from the refrigerator and using a cookie cutter, cut in shapes. Transfer the cut cookie dough to the prepared baking sheet. Re-roll the remaining dough and continue cutting until all is used.
  • Bake for 10 minutes-- the cookies will still appear soft. Make sure you rotate the baking sheet halfway through bake time. Allow to cool on baking sheet for 5 minutes, then transfer to a wire rack to cool completely before icing.
  • Make the icing and decorate the cooled cookies however you'd like. I did not color the icing, as you can see. Add sprinkles on top of the icing if desired. Once the icing has set, these cookies are perfect for gifts, sending, or munching on right away. I find they stay soft for about 5 days at room temperature.
  • Make ahead tip: Unfrosted cookies freeze well up to 3 months. Thaw overnight in the refrigerator. Frosted cookies do not freeze well at all. You can chill the cookie dough for up to 2 days (step 3). You can also freeze the cookie dough before rolling for up to 3 months. Then allow to thaw overnight in the refrigerator. Then allow to come to room temperature for about 1 hour. Then roll and continue with the recipe as directed.